More often than not, your PC will be supplied with a generic image that might look nothing like the PC tower in front of you, and the connectors might be different too. Here we’ll show you how to plug everything in and get your computer and display up and running. (Obviously, we’re assuming you have access to another computer – we can appreciate the irony of providing an online guide for a PC that’s not yet running.) Step 1. Connect the keyboard and mouse These days, all keyboards and mice connect to a USB port. Even if they’re wireless, there will still be a receiver which plugs into one (or possibly two) USB ports. The USB cable looks like this:
… and the plug will fit only into a matching USB port on your PC. If there’s a choice between black or blue USB ports, use the black ones. Blue ones use the new USB 3.0 standard, which is best reserved for fast storage devices such as hard drives and USB flash drives. Ideally, plug your keyboard and mouse into USB ports at the back of your PC rather than the front. You might see green and purple connectors (below) on your PC for the keyboard and mouse: these are the old PS/2 standard and aren’t used these days.
Step 2. Connect the monitor Monitors use a variety of standards to connect to PCs, but the main ones are: VGA, DVI and HDMI.
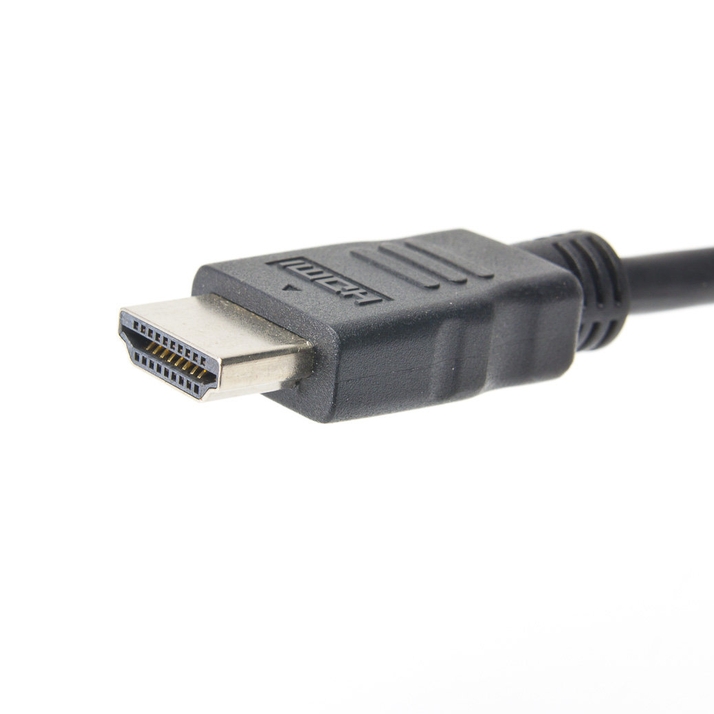
There’s also DisplayPort, which looks a bit like HDMI, but that’s still rare. If there’s a choice, use DVI or HDMI. VGA is best avoided as it isn’t a digital connection. Your monitor may have come with only a VGA cable (below) but might have DVI and HDMI inputs as well. If this is the case, you should buy an HDMI or DVI cable and merely use the VGA cable as a temporary measure. Below is an HDMI cable, and can send both video and audio to a monitor.
Some monitors with HDMI don’t have built-in speakers, and might only have a headphone output. Generally it’s best to connect separate speakers to your PC (see below). This is a DVI cable, and sends only video from the PC to the monitor.
If your monitor has only a VGA input, but your PC doesn’t have a VGA output, you will need a VGA-to-DVI converter. They look like this:
You should find one has been supplied with your PC, but if not, they are inexpensive to buy. When connecting the video cable to your PC, be sure to connect it to the right output. Some PCs have two graphics cards – one that’s built-in and a separate one that’s on a plug-in card (PCI Express). If this is the case, you want to connect the monitor to the PCI Express graphics card, which will be located separate to the other connectors on the back of the PC. The general rule is to plug your monitor into the lowest possible port. Step 3. Connect the network Unless your PC has built-in Wi-Fi, you’ll need to connect a network cable to get internet access. This is a network cable.
This is the socket into which you need to plug it:
If your PC doesn’t have wireless networking and isn’t close enough to your broadband router, you might need to buy some powerline networking (HomePlug) adaptors. Here’s a guide on setting up powerline networking adaptors. Step 4. Attach speakers and microphone Most PC speakers connect via a standard ‘minijack’ cable which has the same 3.5mm connector as most headphones. Connect your speakers to the green minijack output on the rear of your PC.
Most PCs will have three minijack outputs, since they can produce surround sound. If you have surround-sound speakers – also known as 5.1 – they should have colour-coded connectors. Green is for the main left and right speakers, orange is for the centre speaker and subwoofer, and black is for the rear (surround) left and right speakers. A pink minijack connector is for a microphone. Light grey is for side speakers in a 7.1-channel speaker system. There may also be green and pink connectors on the front panel of your PC, to which you can connect headphones and a microphone respectively.
Step 5. Connect power to PC and monitor Virtually all PCs and monitors use the standard ‘kettle’ lead connector for power.
Typically you’ll need two power cables, one for the PC and one for the monitor. Some monitors, however, have an external power supply, so you won’t plug the kettle lead directly into the monitor. Once both the PC and monitor are connected to the mains, ensure any switches are set to the I position, rather than O and then press the power buttons on the front of both devices and your new PC should spring into life. Jim has been testing and reviewing products for over 20 years. His main beats include VPN services and antivirus. He also covers smart home tech, mesh Wi-Fi and electric bikes.