OneNote is a virtual notebook that allows you to clip webpages, make lists, and pretty much store any information you need in an easy-to-use format. The software has been a stalwart of the Office suite for years, but now it’s available for free on PC, Mac, Android, iOS, and Windows phone, giving you access to all your data wherever you are and whatever device you’re using. There’s even a web version, so Chromebook users (and BlackBerry owners) can use OneNote. It’s a lot like Evernote and Google Keep, and you can use it to keep notes in sync across your devices. That’s just one thing it can do, and you can also use it for lists, web clippings and more. Here we’ll show you how to get started with OneNote by planning your next holiday. This is a task that’s well suited to OneNote as it’s ideal for organising the information you’ll need – flight details, addresses, sights to see, things to bring and more.
Get started with Microsoft OneNote
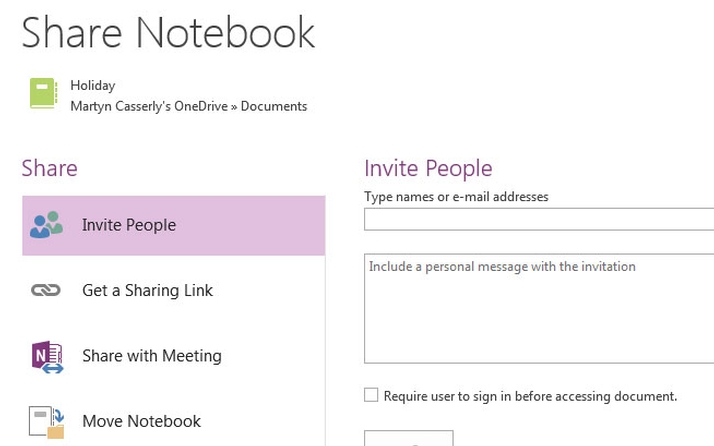
Step 1. To download the application for your PC or Mac go to www.onenote.com and click ‘Free Download’ at the top of the screen. You’ll need a Microsoft account to use OneNote and OneDrive, but this is also free and gives you 7GB of cloud storage. Step 2. Once the software is installed, launch it and you’ll be presented with your general notebook. The structure has tabs along the top for different sections, and pages in the right hand column that exist within each section, just like many physical notebooks. Step 3. Click on the Notebook tab above the main pane and then select Add Notebook. You’ll be given the option to either create it on your PC or in your OneDrive folder. Select OneDrive, as it makes the notebook available to your other devices. Then click Create Notebook. Step 4. The main pane is where you make your notes, but unlike conventional document tools such as Word the format here is less rigid. You can create notes, lists, or paste in images, then drag them anywhere and resize them via the ribbon menu at the top. Step 5. To create a checklist go to the ribbon menu and click Home, then in the section marked Tags select To Do. A section with an empty box will appear in the main pane, now just type each item and press return, and the list is done. Step 6. A useful feature for Outlook users allows you to set up reminders by selecting an item in your list, then going to the Tags section and clicking on Outlook Tasks. Now you can allocate a timescale and the reminder will automatically appear in Outlook. Step 7. Click on the + tab to create a Places section. Look for restaurants or tourist sites via your browser, then copy and paste them into the notebook or press Windows+S to use Onenote’s web clipper, which fades the screen and allows you to highlight the area you want. Step 8. Once you have the information in OneNote you can highlight any part of the text and then drag it to your preferred place on the screen. This creates a box around it which you can resize by dragging the edges. Very useful for directions and opening times. Step 9. Click ‘Add Page’ in the right hand column and repeat the process until you have all the information on Places that you desire. Add new tabs for other subjects such as Food, History, Maps or whatever you think will be useful. Step 10. You can easily share the notebook with those joining you on your trip even if they don’t have Onenote. Go to File>Share, and enter an email address. The drop box at the end also allows you to decide whether they can edit the notebook or not. Step 11. Go to the app store for your phone or tablet and download the OneNote app. Once logged in the notebooks will sync automatically and the information will be available offline. All that remains now is to order those bermuda shorts and sun tan lotion. Martyn has been involved with tech ever since the arrival of his ZX Spectrum back in the early 80s. He covers iOS, Android, Windows and macOS, writing tutorials, buying guides and reviews for Macworld and its sister site Tech Advisor.