Samsung often releases an official firmware update via OTA (over the air). Since this update is rolled out area-wise, it usually takes time to release everywhere. Most importantly, not all Samsung phones receive the OTA update right away. The regions and the network carrier are the main aspects that determine the timeline of your latest Android update. This makes the users land upon the custom ROMs, kernels, and mods. To enjoy and experience the latest Android update, users often install unofficial custom ROMs on their devices. However, this is a risky process; hence, sometimes, they end up bricking their phone or getting stuck into a boot loop issue. In such a case, the only fix is to install Samsung firmware using Odin. Related Post: How to Install Samsung Firmware without ODIN This can instantly help you get back to your device. To install Samsung firmware using Odin, all you need is a Windows-based computer, the Odin tool latest version, and a standard USB cable. Yes, that’s it! With such simple tools, you can quickly recover the Samsung phone. Before we start installing Samsung firmware using Odin, let’s learn about the Odin tool.
What is Odin?
Odin flash tool, aka Odin Downloader, is a Samsung firmware flashing tool for Windows OS. It manually updates the Samsung Galaxy device using Official Stock firmware. Besides, you can even use Odin to unroot, unbrick, and restore default factory settings on your Samsung phone. Moreover, you can also use Odin to manually downgrade or upgrade your device firmware to the latest Android version. It is a Windows-based one-click tool that Samsung uses to install Stock ROM, kernels, CF-Auto-Root, TWRP recovery, etc., that are in the .tar and .tar.md5 format. Initially, the company used this software internally for testing purposes. They never officially released it for the end-user. However, it was leaked over the internet. Now it is actively supported by the Android development community. Before we start the process of installing Samsung firmware using Odin, you should check if the update has already been sent to your device over the air. You will usually get a notification when an OTA update is available. If not, then navigate to Menu > Settings > Software update menu and check the Samsung OTA status. If you wish to roll back to the original stock ROM, follow our easy step-by-step guide on installing Samsung firmware using Odin Multi Downloader.
Odin Tool Features
Upgrade to latest Samsung firmware Downgrade to earlier stable version Fix Software bugs or glitches Supports custom kernels, and mods Solve internet connectivity issues Fix boot loop problem No installation required Supports custom ROMs like LineageOS Supports TWRP custom recovery Supports PIT file for Re-partition Fix black screen or soft brick issues Supports CF-Auto-Root for rooting Occupies minimal space Simple user interface and extremely light
Disclaimer
This flashing process is risky and might brick your Samsung device, thus making it useless. We request you to read and follow the complete guide carefully. If your phone gets bricked by using this guide, then we at Droid Thunder will not be held liable for that. Proceed with caution.
Requirements
You need a Windows-based PC and a standard Samsung USB cable. This process will consume your device’s battery. Hence, ensure to keep your phone fully charged before going ahead. Back up your contacts, messages, applications, call logs, and notes, etc. This is essential as everything gets wiped out in this process. Enable USB Debugging mode from your mobile settings. (Optional) Temporarily disable all the security tools and Antivirus on the PC.
Steps to install Samsung Firmware using Odin
Go through the step-by-step guide to flash Samsung Stock firmware using the Odin tool.
Step 1: Install Samsung USB Driver on your Windows PC
You’ll need to install mobile-specific USB Drivers to detect your Samsung Galaxy Device by PC when connected via USB cable. Without a USB driver, your computer will not be able to recognize the connected Samsung device, thus failing the Odin process. You can install the drivers from the Samsung Kies CD that you received at the time of purchase. Or you can manually install them from the link given below:
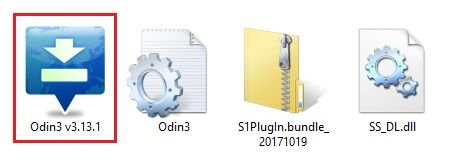
Step 2: Download Odin Latest Version for PC
Download Odin3_v3.13.1, which is the latest version currently. Note that this latest Odin tool will work only on the new Samsung Galaxy phones. However, older Samsung devices might face connection problems. Hence, download and install the correct version of the Odin tool for your device.
Step 3: Download Samsung Firmware File
It is necessary to download Samsung Stock ROM from an official verified source like Sammobile, Updato, or the SamFirm tool. However, downloading the firmware from an unknown website can be dangerous, especially if it has been modified with malicious malware or virus. If you are looking for the best website to download Samsung firmware, then refer to our guide to clear your confusion:
Step 4: Extract the Firmware Zip File
Right-click the downloaded Samsung firmware and extract it into a specific folder on your computer. You’ll have the following files in the extracted folder:
These files should have ‘.tar’ or ‘.tar.md5’ extension.
Step 5: Boot Samsung Galaxy Phone into Download Mode
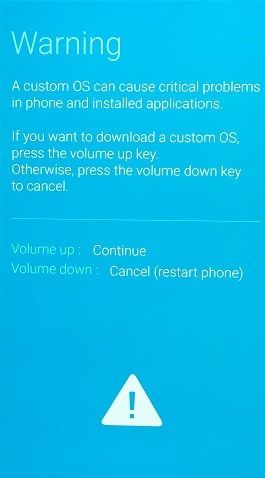
Before we start the process of installing Samsung firmware using Odin, you need to restart your phone into downloading mode. To do so, firstly switch off your mobile. With the phone turned off, press and simultaneously hold the Volume Down + Power button + Home button. Leave all the keys as soon as you see a warning message, as shown below.
Press the Volume Up button now.
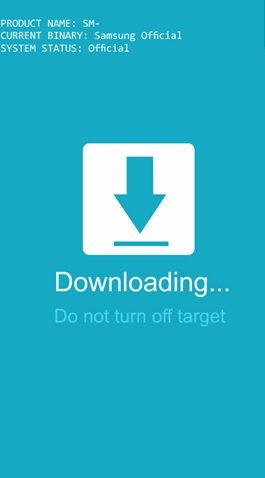
This will boot your Samsung device into download mode. Note that every Samsung device will require a different key combination to boot into download mode. To find the exact buttons for your device, search on Google (for example, Galaxy S6 Download Mode).
Step 6: Connect your Samsung phone to PC
Keeping the phone in download mode, connect it to the computer using a standard USB cable.
Step 7: Launch Odin Multi Downloader
Open the downloaded Odin flash tool.
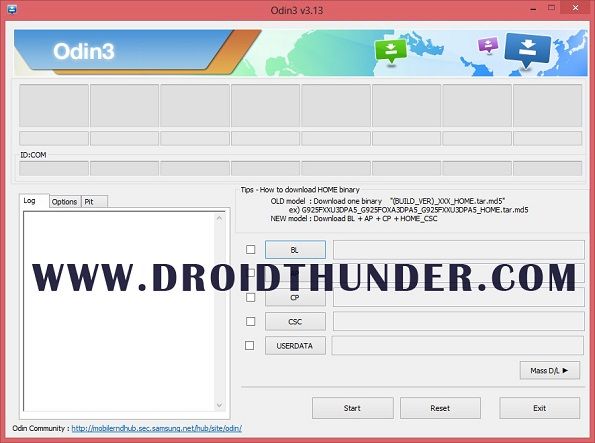
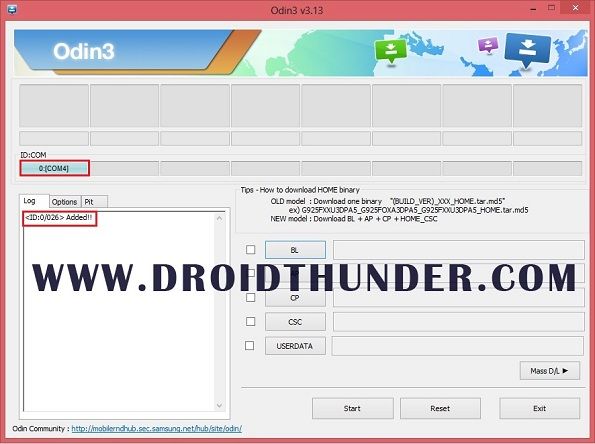
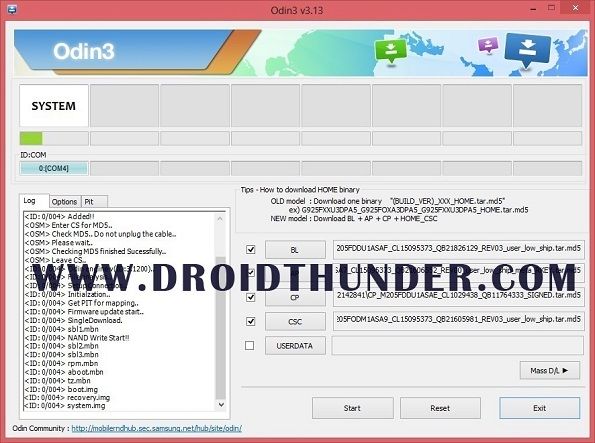
As soon as you launch it, the ID: COM section located at the top left corner will turn light blue. Also, an Added message will appear in the message box window.
This will confirm that your Samsung Galaxy device is successfully connected to the computer. If such a thing doesn’t happen, install the USB drivers again or change the USB cable or USB port. If the problem persists, that means you have a USB connection problem in your PC. To fix this issue, refer to our guide:
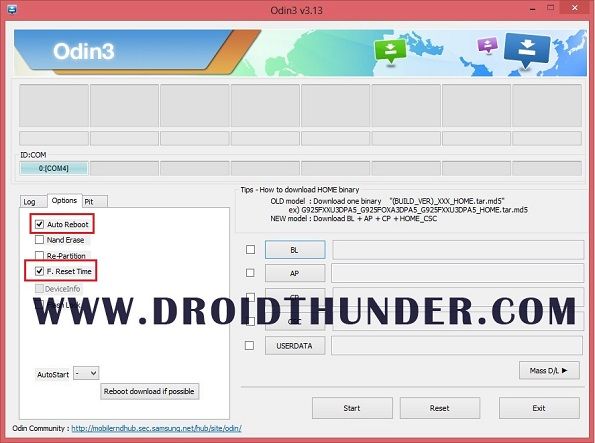
Moreover, check the Auto Reboot and F.Reset Time options.
IMPORTANT! Do not tick the Re-partition option, as it might brick your device. Don’t use the PIT tab, either.
Step 8: Add Samsung firmware files to Odin
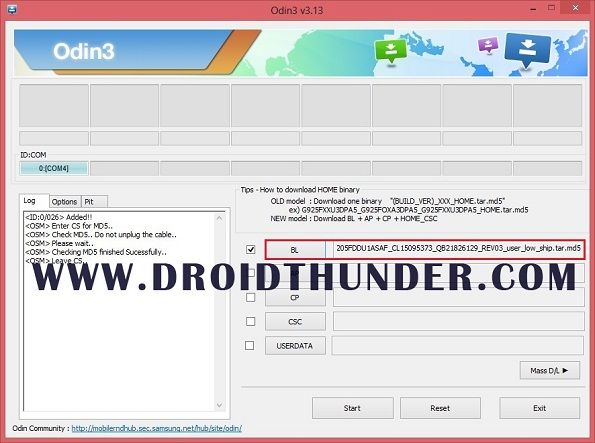
To install Samsung firmware using Odin, we’ll need to add tar.md5 firmware files one by one in the Odin tool. The main screen of Odin features four buttons, viz. BL, AP, CP, and CSC. BL means Bootloader, AP means Android Partition, CP means modern firmware, and CSC stands for Consumer software customization. First, tap on the BL button. Then browse and select the firmware package file with ‘BL’ in its name.
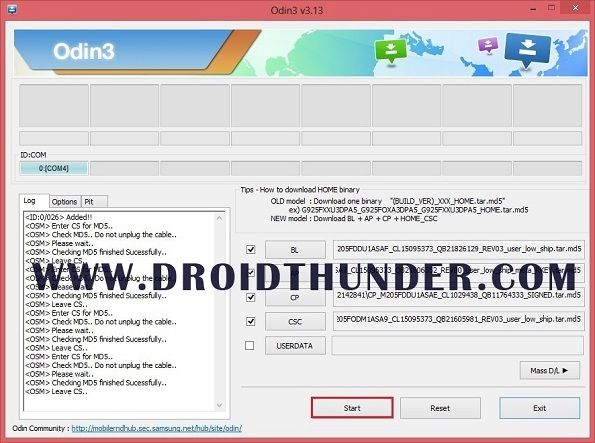
Similarly, add the CP, AP, and HOME_CSC files from the firmware package. The AP file will take a little time to load. Make sure you choose the HOME_CSC and not the CSC file. This is because the Normal CSC contains an instruction that allows Odin to wipe out complete data while HOME_CSC contains an instruction to only allow the wipe of cache. But a factory reset is a must when a downgrade is done (for example: from Oreo back to Nougat). So use normal CSC at that time. At last, you can add the USERDATA file if it is present in the firmware package; else, skip this step.
Step 9: Begin the Samsung firmware flashing process
After adding all the firmware files in the Odin flash tool, let’s initiate the process of installing Samsung firmware using Odin. For that, simply press the Start button located on the Odin tool.
This will begin the actual Samsung Stock ROM installation process. Be patient and wait until the process completes.
The firmware flashing will take a few minutes to complete. As the process goes on, your phone will boot itself automatically. IMPORTANT! Do not disconnect the device from your computer. Unplugging the phone or closing the Odin tool during the flashing process might result in unwanted outcomes.
Step 10: Finishing the firmware flashing process
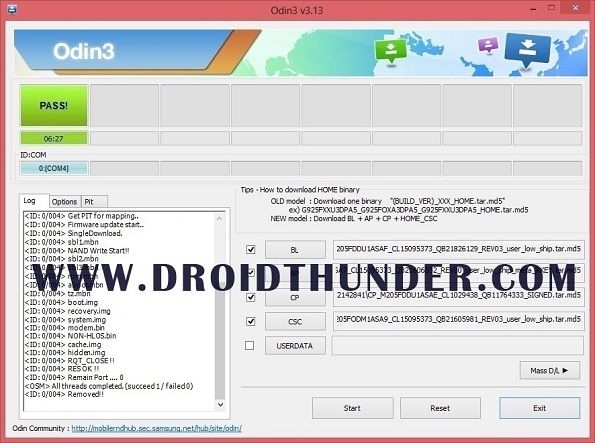
Upon completion, the ID: COM section will turn green with the message ‘Pass’ on it.
This is how you can install Samsung firmware using the Odin tool. Besides, your phone will reboot automatically. Now, you may safely remove the USB cable and disconnect your phone from the computer. Note: If Odin fails or gets stuck, or in case your phone gets stuck into the boot loop, then don’t worry. Just close the Odin software, boot your phone into download mode and repeat the entire process.
Conclusion
Finally! This is how you can install Samsung firmware using Odin Multi Downloader, aka Odin Flash Tool. If you have any questions about this guide, please feel free to comment below. Thank you! Source Notify me of follow-up comments by email. Notify me of new posts by email.
Δ used on Samsung Galaxy A71 upgrading to Android 12 work like magic ! thank you from iraq